The mission was to construct a shock-absorber ( screamer) out of components found on an average rack.
Furthermore, the rig had to be "reusable". This has an advantage over mission-specific, shop bought shock-absorbers, which are "use once".
Although some manufacturers offer a "return for a re-stitch" service, this is not really viable mid-route or if you are based in the middle of nowhere.
|
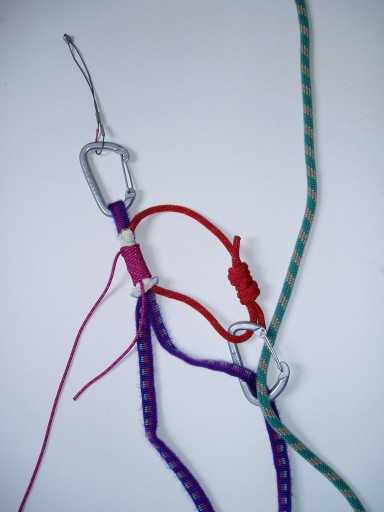
Fig. 1
|
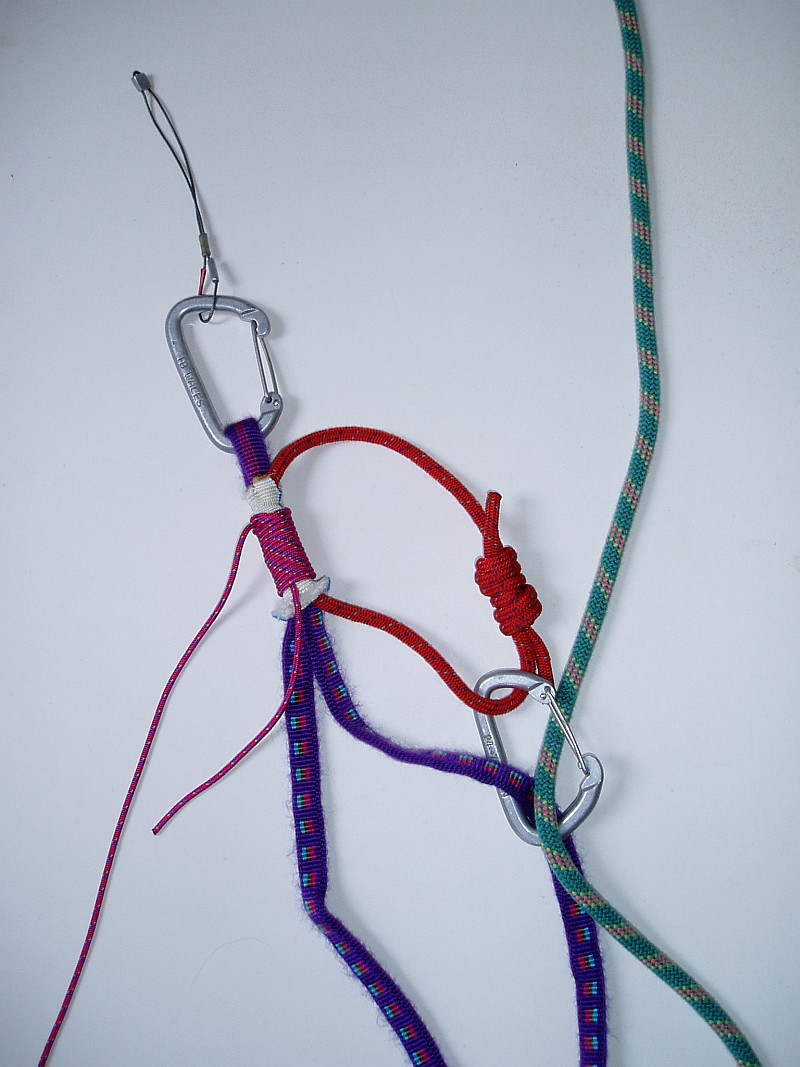
Overview of the Mark II Rig
This new rig consists of:
- A long nylon sling, clipped into suspect gear at the protection end. ( top
of the Fig. 1)
- A small length of 1 inch tubular tape.
- The nylon sling and a length of 6mm cord is threaded through the tubular tape.
- The 6mm cord is tied up to form a loop and attached to the rope by a karabiner( bottom of the
Fig. 1).
This configuration is set high, i.e. close to the suspect protection.
The idea is for the tubular tape and cord, karabiner and rope ( Slider section) to slide down the sling when loaded.
This will dissipate energy from the fall. An over hand knot can be tied at the bottom of the rig, to shorten the distance of the slide. ( See Fig. 2)
Note: Click on the pictures for an enlargement ( 1-2mb)
|
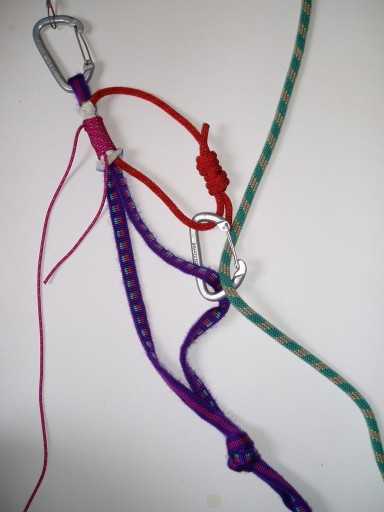
Fig. 2
|
|
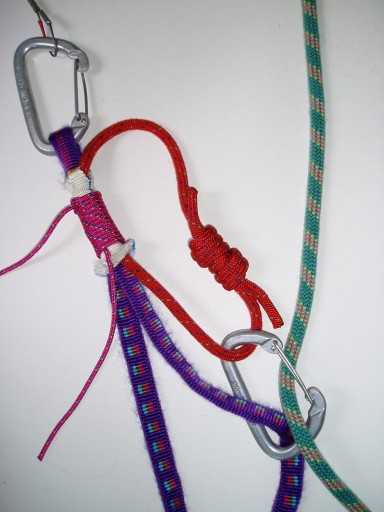
Fig. 3
|
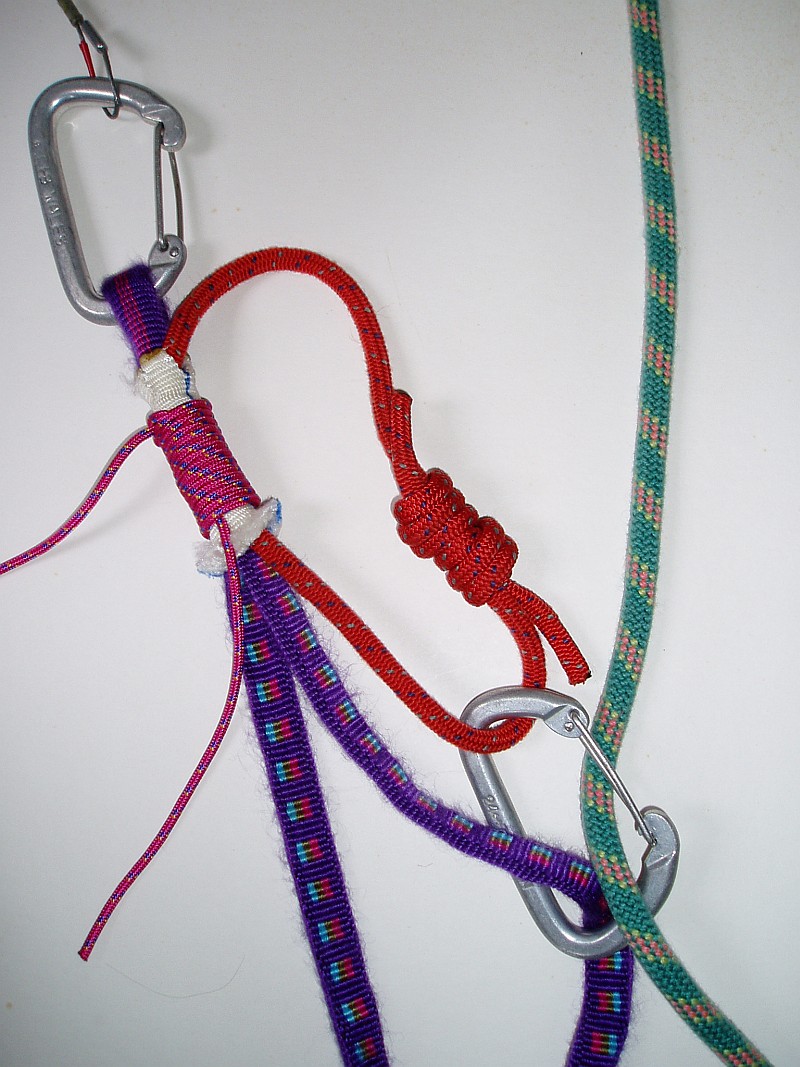
The Slider Section
The Slider section consists of a small length of 1 inch tubular tape, a length of 6mm cord, a length of 4mm cord,
connected to the rope with a karabiner.
All components of the Slider section are made from Nylon or Perlon.
Do not use Dyneema or Spectra as those materials have a relatively lower melting point.
( See Fig. 3)
The Slider is constructed by threading the sling and 6mm cord though the tubular tape ( a Beeston Broddler may be useful).
The 6mm cord is tied off with a double fishermans to form a loop. The slider is attached to the rope with a karabiner.
In this basic form, the Slider gives a very slick slide, about less than body weight.
More friction is added to the configuration by lashing the 4mm cord round the tubular tape.
The tighter the lashing, the grabbier the Slider becomes.
Things that influence the behaviour of the Slider:
- Length of tubular tape used. I used about 2.5 inches, which made it very easy to thread.
A longer length may well provide more friction but will be more difficult to thread.
- Diameter of the cord. 7-8mm may well give a tighter Slider but again, it will be more difficult to thread through the tubular tape.
- Tightness and number of the additional lashing. This is the bit that really matters!
- Condition of the rig. It is more slippery when wet.
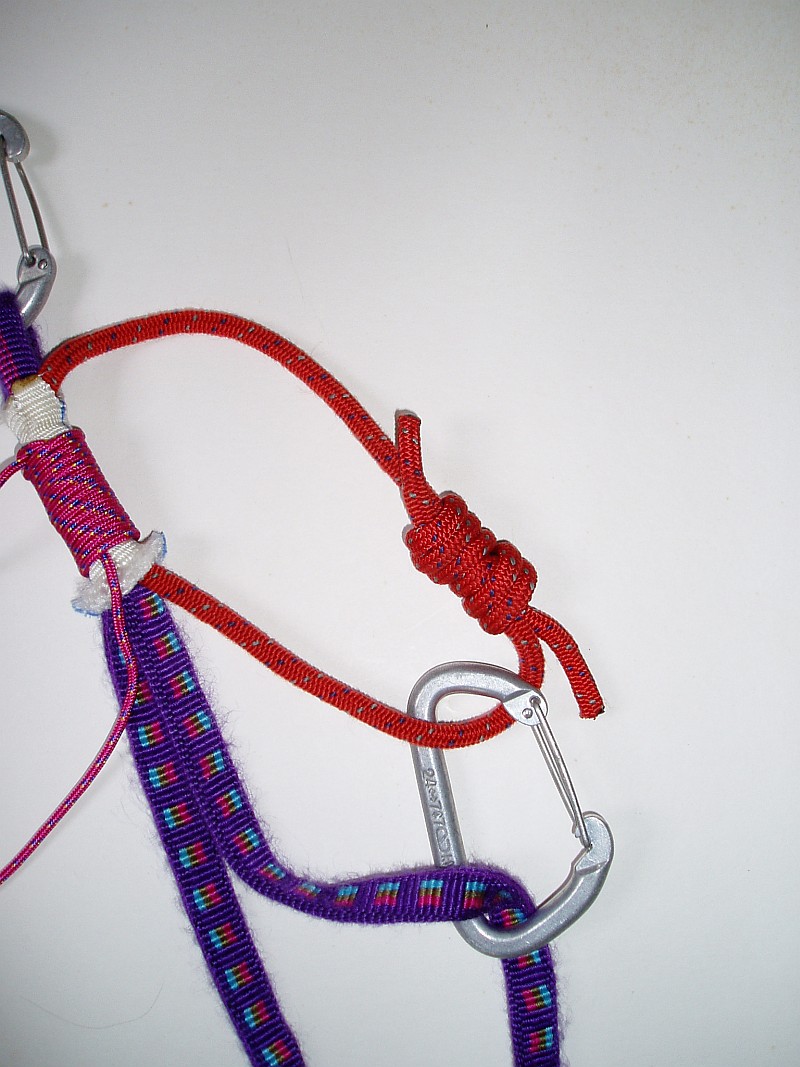
Note: The karabiner is also clipped into the sling to ensure that the Slider is not
the only means by which the CT Death Slide II is connected to the rope. ( See Fig. 4, rope removed for clarity)
|
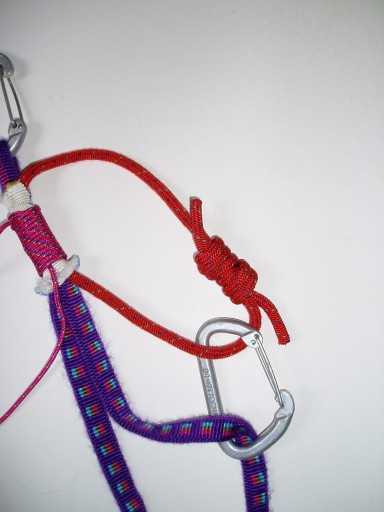
Fig. 4
|
|
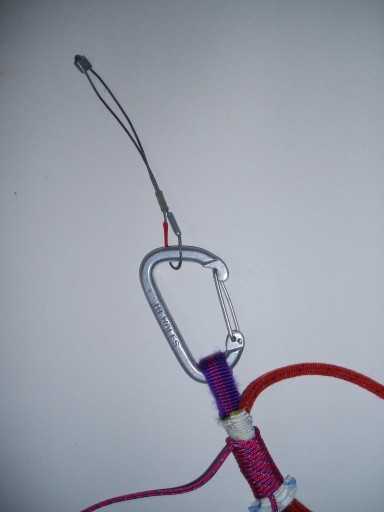
Fig. 5
|
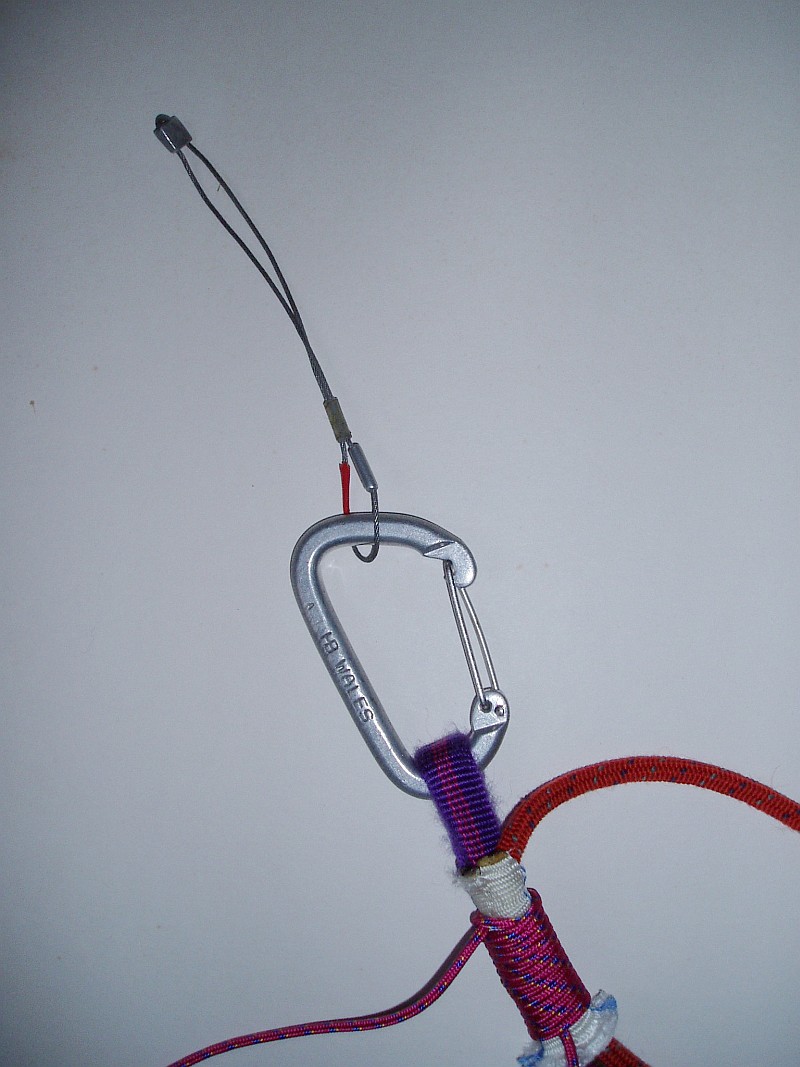
The Protection Section
The Slider section forms a loop at the top end of the sling.
This is clipped into a quickdraw or karabiner which is connected to the "suspect" protection.
The 6mm loop should provide enough floppiness to prevent the suspect protection from lifting. If in doubt, extend it.
Glossary
Beeston Broddler - A length of stiff wire often used to thread pockets on Beeston Tor.
|
|
Additional notes
1. This is a vast improvement over the CTDS1, the prussik loop version.
Features:
- More predictable behaviour of the Slider section
- The additional lashing gives better control of grabbiness
- Alas difficult to construct on the lead
- But still made from off-the-rack components
|
2. Things that affect grabbiness:
- Thickness of the sling and cord
- Length of tubular tape
- Tightness and number of the external lashing ( I used 15 coils)
- Condition of the sling; wet, muddy, iced up, etc
- Other factors not listed above
|
|
3. You should test this rig in a safe environment using components on your rack, before employing it in the field.
- Your dodgy protection must hold at least your body weight. That will be the minimum load
applied to the protection when the rig comes to rest.
- A good bounce test in a safe environment can generate up to twice your body weight.
- Bounce test with a variety of configurations ( different lengths of tubular tape and diameters of cord),
to find a rigging that either:
- slides easily, i.e. less shock on your protection.
- or one that requires more force to shift.
- Select a rigging according to the state of your protection.
- If you are frequently using this rig, you should inspect it carefully for signs of wear and tear.
It is "reusable" but will not last forever!
|
4. Some thoughts on loading:
- The rig should not start to slide with a load of bodyweight or less.
It would be pointless as the rig will not be absorbing sufficient energy to safeguard the suspect protection.
Furthermore, it would increase the length of the fall.
- The rig must hold bodyweight ( See 3).
- I think the optimum set up would be a loading of 1.5 to 2 times bodyweight before sliding.
This will start to dissipate the energy from the fall without overloading the suspect protection.
- Anything higher than 2.5 times bodyweight will probably overload the protection.
|
|
Testing
5. I have not performed any exhaustive testing of the rig. Just the usual drop tests with a heavy rucsac.
If you have a highly developed lemming instinct, please get in touch.
Alternatively, if you have access to any stress testing equipment, I would be interested in seeing just how the rig performs.
|
6. I will try to test this as soon as:
- My nads recover from the Mark I tests.
- My brain forgets the delightful feeling of excruciating pain.
- I don't pull a bird in the near future;-)
|
As with any Chris Tan Death Product™, usual disclaimers apply. Use at your own risk! < Usual laugh follows>
Note: Usual copyright & disclaimers apply. If you would like to use the information or any of the pictures contained in these pages,
contact Chris Tan by first removing the Walnut.
PS. Petzl, Wild Country, DMM, Fish Products, etc. Can I have some beer money? Please!
|
Update and Test Results
7. 25 May 2006: I did some test on the rig last night.
Two lemm-err! Volunteers fell on the rig with no adverse affects to either volunteers or rig.
The tests were conducted in an indoor wall using the rig as shown in the above pictures:
- Test 1: I climbed up to the fourth bolt on the wall on a top rope.
The protection end of the rig was clipped into the insitu quickdraw and the Slider section directly into the belay loop of my harness.
Slack was given on the top rope until I started to load the rig. More slack was given.
The Slider section started to slide very slowly on my bodyweight. ( Diet required?)
- Test 2: I reset the rig and clipped in as in Test 1.
I climbed up above the bolt, thereby setting up a potential fall factor 2 situation.
Sufficient slack was given on the top rope to allow a fall factor 2 fall.
I jumped off! The rig behaved as expected, and the slider section ended up at the bottom of the sling.
It slid and absorbed the energy of a potential fall factor 2. I didn't feel a thing.
- Test 3: This was essentially test 2 repeated by another volunteer. He too reported a smooth fall.
- We visually inspected the rig and harness for damage. There was none that we could immediately see.
- 29 May 2006: I stripped the rig down to check for any signs of damage. The tubular tape had frayed in places and there was a small melt mark on the 6mm cord. ( See Fig. 6) There was no visible damaged to the sling. Considering we subjected the rig to two fall factor 2 falls, I think it survived rather well.
|
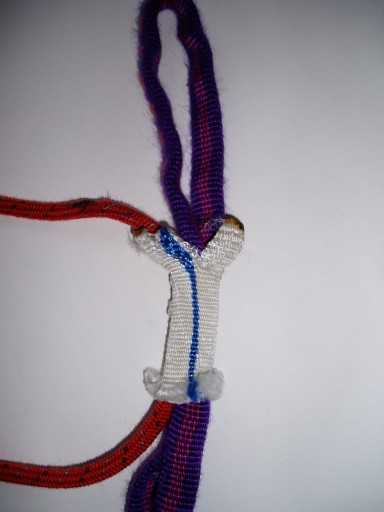
Fig. 6
|
|
8. Additional Comments
- In Test 1, the rig started to slide at bodyweight.
Initially, this caused some concern as the rig may not be absorbing sufficient energy.
Fears were allayed after Test 2.
- In Tests 2 & 3, the Slider section ended up at the bottom of the sling.
I would Strongly advise using a stopper knot or ensure you clip the bottom karabiner as shown in the pictures.
- Both volunteers did not notice any sudden impact, "Very smooth!" was the comment.
- There was no obvious visible damage to my harnesses even after a potential fall factor 2 impact. The rig however fared less well after two fall factor 2 falls. You are advised to inspect it closely after 2 or 3 big pops!
- I would happily use this current rig in a real situation. Having said that, I would still prefer a more grabby Slider section.
- I suggest you do some tests yourself and make your own mind up.
|
|
Last Updated: 22 May 2006